About the course
The Introduction to Logging in Studio course is an intermediate course that introduces you to Robot Execution logs and UiPath logging recommendations. You’ll learn how to set up logging in UiPath Studio projects, how to interpret Robot execution logs, and how to use UiPath Log Message activities effectively
What you will learn in this course
By the end of this course you should be able to:
- Identify and explain the types of UiPath logs and the logging levels.
- Explain what Robot execution logs are and interpret them correctly.
- Use Log Message activities effectively.
- Integrate the logging recommendations in your processes.
Logging Overview
Types of logs in UiPath:
- Studio logs.
- Setup logs.
- Orchestrator diagnostic logs.
- Robot logs.

Robot logs
During process execution, the Robot generates a message (Log) for each step along the way. These are gathered and stored in a Log File. The overall operation of gathering and storing Logs is called Logging.
There are two types of Robot logs:
- Robot execution logs: they’re messages generated by the execution of a process and typically contain information related to its behaviour and user-defined messages.
- Robot diagnostic logs: they provide information related to the Robot itself and its context.
Why is the focus on robot execution logs? Well, robot execution logs can be used to supervise, diagnose, and debug processes in production, gather process performance data, or even track business results like the total value of transactions processed. They can be either default logs or user-defined logs.
Default logs are generated automatically when certain events take place. The events logged by this category are:
- Execution start is generated every time a process is started (Level = Information).
- Execution end is generated every time a process is finalized (Level = Information).
- Transaction start is generated every time a transaction within a process is started (Level = Information).
- Transaction end is generated every time a transaction within a process is finalized (Level = Information).
- Error log is generated every time the execution encounters an error and stops (Level = Error).
- Debugging log is generated if the Robot Logging Setting is set to Verbose, and contains, Activity names, types, variable values, arguments, etc. (Level = Trace).
User-defined logs are generated according to the process designed by you in Studio, when using Log Message Activity or Write Line Activity.
Logging levels in UiPath
Each log has a Log Level that refers to how detailed the generated message is. In other words, logging levels let you sort log messages by severity, or by how important a log message is related to the execution of a process. Log levels are used in Orchestrator to filter out logs below a specific level.
| Logging Level | Meaning |
|---|---|
| Fatal/ Critical | The robot cannot or shouldn’t recover from this error. Something has gone critically wrong and the process needs to stop. For example, the robot has no means of handling an exception, or if the process is using Browser UI automation, the website it’s interacting with displays a message that it is under maintenance. |
| Error | An error has occurred. The robot will try to recover and move on to the next item. |
| Warning | Any important data that you need to stand out from the rest of the log information. |
| Information | Information about robot progress. Usually includes when you enter/exit a workflow, when data is read from an external source, etc. |
| Trace | Information that’s useful while developing/debugging, however not useful and needed in production. |
| Debugging/Verbose level | Verbose level generates default logs for the execution of each Activity, allowing a much more in-depth diagnosis by giving more information about the values of variables and arguments. You can generate verbose logs by enabling the ‘Log Activities‘ option in Studio. |
Verbose level logs
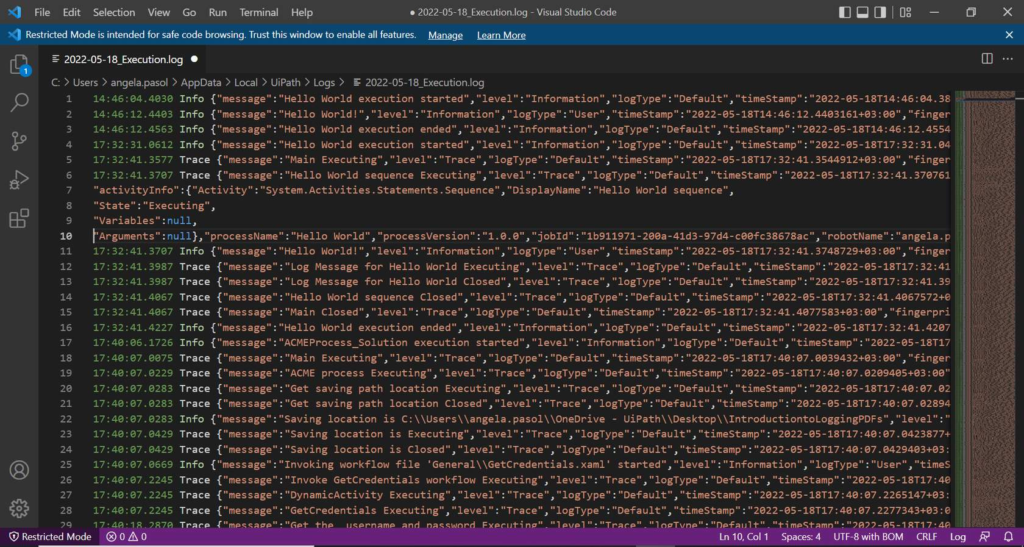
The verbose level logs a message for both the activities — start and end, plus the values of the variables and arguments that are used. The verbose level is used for debugging.
By default, the Verbose level includes:
- Execution started log entry – generated every time a process is started.
- Execution ended log entry – generated every time a process is finalized.
- Transaction started log entry – generated every time a transaction item is obtained by the robot from Orchestrator.
- Transaction ended log entry – generated every time the robot sets the transaction status to either Success or Failed.
- Activity information log entry – generated every time an activity is started, faulted or finished inside a workflow.
By default, running a process in Studio will record trace-level logs. To set logging to a verbose level locally, access the Debug ribbon, enable the Log Activities option, and run the process in debug mode.
Accessing and Reading Robot Execution Logs
There are several places where you can access Robot Execution Logs:
- In the Output Panel in UiPath Studio for the previous process execution from Studio.
- In the %localappdata%\UiPath\Logs\<shortdate>_Execution.log file for all processes ran on the machine from UiPath Studio. Logs are generated at Trace level and above or Verbose level and above depending on whether the Verbose level is activated or not.
- In the %localappdata%\UiPath\Logs\<shortdate>_Execution.log file for all processes ran on the machine from UiPath Assistant. The logs are generated at the level defined in UiPath Assistant and above.
- In Orchestrator, in the Logs section when running processes while connected to Orchestrator. The logs are generated at the defined level and above.
To learn how to write effective log messages and interpret the log files, the logs that you should be interested in are the ones from the Output panel and %localappdata%\UiPath\Logs\<shortdate>_Execution.log.
The anatomy of a log entry
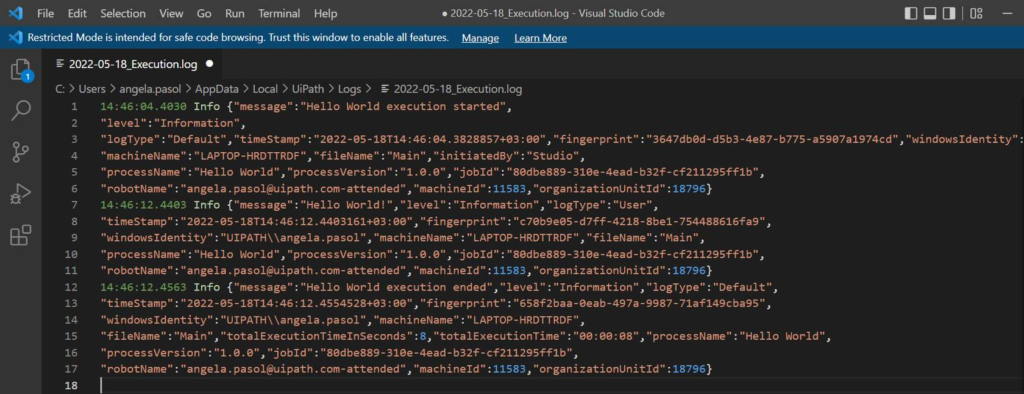
Time to understand how log entries are structured. These entries can be very helpful when checking execution logs to analyze behaviour or figure out what caused an exception. Logs are in the form of a JSON, pretty much just a key-value pair (“field1:value1,” “field2:value2”).
The default log fields are present in all logs:
- Message: the log message.
- Level: defines the log severity.
- Timestamp: the exact date and time the action was performed.
- FileName: the name of the .xaml file being “executed”.
- JobId: the key of the job running the process.
- ProcessName: the name of the process that triggered the logging.
- ProcessVersion: the version number of the process.
- WindowsIdentity: the name of the user that performed the action that was logged.
- RobotName: the name of the robot (as defined in Orchestrator).
Aside from default fields, logs can also contain type-specific fields and user-defined fields.
- Type-specific fields are present depending on the log type, like totalExecutionTimeInSeconds and totalExecutionTime for Execution End.
- User-defined fields are defined in Studio (by using the Add Log Fields Activity) and appear in all resulting logs after the activity is generated unless they are (programmatically) removed by the activity Remove Log Fields.
Identify the key log fields generated at the Trace level and above.
These are the types of log files generated when executing a project in run mode.

Identify log entries generated at the Verbose level and their key fields.
These are the types of files generated when running a project locally in debug mode with the Log Activities option enabled.

Setting the log level for UiPath Assistant
Running a process from UiPath Assistant will send the logs to Orchestrator if connected, but also generate logs in %localappdata%\UiPath\Logs\<shortdate>_Execution.log.
The log entries are generated at the level set in UiPath Assistant and above. For example, if the level is set to Error, it’ll only generate the logs at the Error and Fatal levels.
Logging Recommendations
Log message activities should ideally be used:
- each time an exception is caught in a Catch block (Log level = Error).
- each time a Business Rule Exception is thrown (Log Level = Error).
- when data is read from external sources. For example, log a message at the Information level when an Excel file is read (Log Level = Information).
- in Parallel or Pick activities, log messages on every branch, to trace the branch is taken (Log Level = Information).
- in If/Flowchart Decision/Switch/Flow Switch activities. Note: there should not be more than two (maximum three) nested IF statements, so it depends from workflow to workflow if you should add or not log message activities.
When you invoke a workflow use the two properties Log Entry and Log Exit (Log level = Information). These let you specify if you want to log entry into/ exit from an invoked workflow. This is particularly useful for debugging without adding lots of Log Message activities.
Write meaningful log messages: the message should be clear enough.
Add context to your log message: include values of meaningful variables in that context.
Facts
The types of logs generated by the execution of a process are called Robot Execution Logs. They can be further split into default logs and user-defined logs.
…
How would you access the Robot Execution Logs in Studio?
Answer: Access the Debug Ribbon > Click Open Logs > Open the execution log file
…
Which of these files would you open to investigate a process that ran on a specific date?

Answer: 2022-05-18_Execution
…
What category in the Output panel would you leave enabled to check the Fatal level logs?
Answer: Trace
…
Which activity adds custom log fields to the robot execution logs?
Answer: Add Log Fields
…
Which two sentences are true about Robot Execution Logs?
Answer:
- They can be either default logs or user-defined logs.
- They are messages generated by the execution of a process.
…
Check if the log level for the Catch block is correctly set.

Answer: No, it should be Fatal.
…
What is the keyboard shortcut for accessing the log folder?
Answer: Ctrl+L
Congratulation

